在虛擬化和雲計算以及容器時代,我們將很多物理服務器所跑的應用全部遷移至以xen虛擬化私有雲中。這時候會面臨物理服務器遷移到虛擬服務器的問題。遷移windows到是xencover可以干,但是linux呢,網絡上很多人都沒有說。這裡我簡單介紹下遷移流程:
1.使用clonezilla live cd啟動物理服務器
2.使用網絡方式掛在nas
3.使用dd將硬盤block導到nas上
4.啟動vm即可!
來點圖:
Step 1 use “clonezilla Live CD”
Step 2 boot using Clonezilla Live CD
Step 3 Choose language in Clonezilla live
Step 4 Keyboard selection in clonezilla live
Step 5 Enter clonezilla or shell command (choose shell command)
Step 6 Choose option “2″
Step 7 You’ll get “$” prompt
Step 8 $ sudo bash
Step 9 # ifconfig eth0 XXX.XXX.XXX.XXX
Step 10 # passwd (change root passwd)
Step 11 # /etc/init.d/ssh restart
Step 12 Create new VM with HDD/CPU/MEM
Step 13 Boot VM with Clonezilla Live CD
Step 14 Follow above 11 step
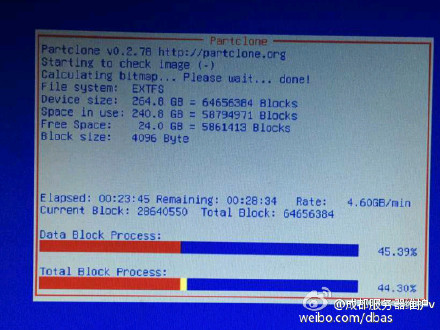
Step 15 # dd if=/dev/sda |gzip -c | ssh root@target ip address ‘gzip -d | dd of=/dev/sda’
Step 16 reboot VM