Linux進程包括核心進程和普通進程,把普通進程綁定到Linux系統CPU核中運行,那麼普通進程就成了核心進程。本文就以Ubuntu為例子來介紹一下,在Ubuntu中怎麼綁定CPU進程。
taskset -cp 《CPU ID | CPU IDs》 《Process ID》
下面用一個簡單的例子來說明怎樣做到。
1. CPU利用率達100%的樣例代碼:
class Test {
public static void main(String args[]) {
int i = 0;
while (true) {
i++;
}
}
}
2. 編譯並運行上面的樣例代碼
# javac Test.java
# java Test &
[1] 26531
3. 使用htop命令查看CPU的利用率
如果未安裝htop工具,執行下面的命令:
# apt-get install htop
Reading package lists... Done
Building dependency tree
Reading state information... Done
The following NEW packages will be installed:
htop
0 upgraded, 1 newly installed, 0 to remove and 41 not upgraded.
Need to get 66.9 kB of archives.
After this operation, 183 kB of additional disk space will be used.
Get:1 http://mirrors.163.com/ubuntu/ precise/universe htop amd64 1.0.1-1 [66.9 kB]
Fetched 66.9 kB in 0s (163 kB/s)
Selecting previously unselected package htop.
(Reading database ... 57100 files and directories currently installed.)
Unpacking htop (from .../htop_1.0.1-1_amd64.deb)...
Processing triggers for man-db ...
Setting up htop (1.0.1-1)...
安裝完成後,執行命令:
# htop
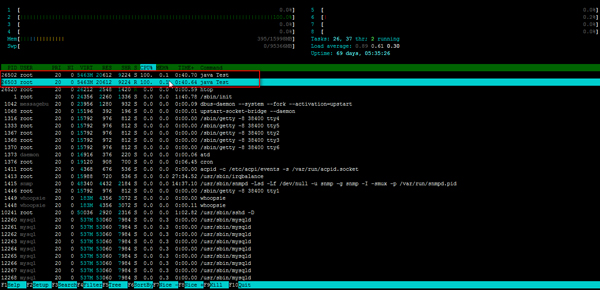
上面的視圖可以看到,CPU2的利用率達到100%,且這個進程有可能被分配到其它CPU核上運行,這個分配是不定的。
4. 進程綁定CPU核
運行以下命令,把此Java進程(進程ID號為26502)永久的分配給5號CPU核(CPU核號從0開始計算,因此序號4指的是5號CPU核)
# taskset -cp 5 26531
pid 26531‘s current affinity list: 0-7
pid 26531’s new affinity list: 5
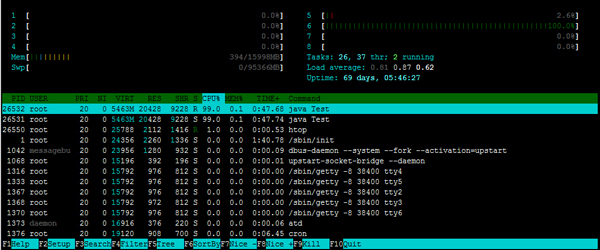
從上面的視圖中可以看到6號CPU核的利用率為100%。
以上就是在Ubuntu中怎麼綁定CPU進程的介紹了,當然有些CPU核可能不只一個,不過不管綁定到哪個核效果都是一樣的。