System.DirectoryServices使用戶能夠通過ASP.NET訪問一些基本的用戶管理功能。這篇文章首先回顧了活動目錄(AD)的有關概念,然後簡要地討論了實際的System.DirectoryServices名字空間本身,最後給出了可供我們在實際應用程序中使用的代碼。
活動目錄是什麼?
在目前的網絡環境下,能夠方便地控制對各個網絡設備的訪問是非常關健的。在控制誰在何時有訪問何種設備的權限時,需要有一整套方法,這些設備包括打印機、文件以及其他的局域網或分布式網絡資源。AD能夠提供這些功能,由於與操作系統的整合非常緊密,這意味著AD能夠在非常低的級別上提供支持。
AD的工作原理
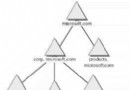
單地說,AD就是一個內容為所有網絡資源、分層次、面向對象的數據庫。最頂層的對象一般是Organization (O),在該組織單元(OU)之下是容器,最後是包含實際資源的對象。這種分層次的格式為系統管理人員創建了一種熟悉和易於管理的“樹”。例如,如果指定一個OU訪問一個實際的資源,這一權限也將被賦予包含在其中的對象。
如何創建AD?
在.NET Framework中,微軟為我們提供了System.DirectoryServices名字空間,它又使用了活動目錄服務接口(ADSI)。
DSI是通過編程與許多不同的目錄服務提供者交互的方式,也就是一種編程接口。
System.DirectoryServices空間中的類能夠與如下所示的活動目錄服務提供者配合使用:
表1.1 AD服務提供者
目錄服務提供者
路徑
Windows NT 5.0、Windows 2000或Windows XP
WinNT://path
Lightweight Directory Access Protocol (LDAP)
LDAP://path
Novell NetWare Directory Service
NDS://path
Novell Netware 3.x
NWCOMPAT://path
Internet Information Services (IIS)
IIS://
在System.DirectoryServices名字空間內,有二個主要的類:System.DirectoryServices.DirectoryEntry和System.DirectoryServices.DirectorySearcher類。本篇文章不涉及這二個類的細節,需要注意的是,DirectorySearcher只能與LDAP提供者一起使用。
在使用DirectoryEntry對象時,每個對象都有一個模式。模型是對象條目的類型。例如,如果有一個User模式的DirectoryEntry對象,它就代表是一個用戶。
在本篇文章中,我們使用了Windows 2000提供者(WinNT://)和System.DirectoryServices.DirectoryEntry類。
用戶管理
在本篇文章的例子中,我們使用System.DirectoryServices名字空間創建一個數據訪問層(DAL),執行一些非常基礎的用戶管理任務。DAL是對執行數據訪問的真實的復雜性進行抽象的一種方法。例如,如果我們要編寫一個訪問Access數據庫的DAL,就可以在對象中隱藏所有與ADO.NET有關的任務。當開發人員需要與數據庫打交道時,只需要簡單地使用這些對象,而無需關心特定的實現細節。開發者根本無需為ADO.NET操心,即使是以後決定升級到SQL Server,也只是需要改變DAL,使之適合新的數據庫即可,其他的東西無需改變。
用戶對象
我們建立的第一個對象用來表示任何給定用戶的當前狀態,該對象對User模式的DirectoryEntry類進行抽象。為了清楚起見,它看起來更象一個實際的User對象。
namespace DSHelper {
public class DSUser {
public DSUser(System.DirectoryServices.DirectoryEntry user) {
this.domainName=user.Path;
this.Username=user.Name;
this.Password=user.Password;
try {
this.FullName=Convert.ToString(user.Invoke("Get", new object[]
{"FullName"}));
this.Description=Convert.ToString(user.Invoke("Get", new object[]
{"Description"}));
this.PasswordExpired=Convert.ToInt32(user.Invoke("Get", new object[]
{"PasswordExpired"}));
this.RasPermissions=Convert.ToInt32(user.Invoke("Get", new object[]
{"RasPermissions"}));
this.MaxStorage=Convert.ToInt32(user.Invoke("Get", new object[]
{"MaxStorage"}));
this.PasswordAge=Convert.ToInt32(user.Invoke("Get", new object[]
{"PasswordAge"}));
this.HomeDirectory=Convert.ToString(user.Invoke("Get", new object[]
{"HomeDirectory"}));
this.LoginScript=Convert.ToString(user.Invoke("Get", new object[]
{"LoginScript"}));
this.HomeDirDrive=Convert.ToString(user.Invoke("Get", new object[]
{"HomeDirDrive"}));
this.userDirEntry=user;
}catch(Exception e) {
throw(new Exception("Could not load user from given DirectoryEntry"));
}
}
public DSUser(string Username, string Password, string DomainName) {
domainName=DomainName;
if(domainName=="" || domainName==null) domainName=Environment.MachineName;
username=Username;
password=Password;
}
private object groups=null;
public object Groups{get{return groups;} set{groups=value;}}
}
}
圖1.2 User對象
我們的用戶對象有二個缺省的構造器。第一個用來用一個給定的DirectoryEntry對象對我們的用戶進行初始化,它將使用Invoke方法從對象中“獲取”用戶的屬性。
第二個構造器用來創建一個新的用戶。我們只需要向它傳遞三個參數,在用來創建新用戶時,它就會創建一個新的DSUser對象。需要注意的是,由於沒有完成任何的AD操作,因此我們並沒有在AD中創建真正的用戶。
數據訪問層(DAL)
下一步就是創建AD的DAL封裝了,下面的一些代碼是分步驟完成的完整的UserAdmin DAL代碼。
我們首先創建並初始化在UserAdmin類中所需要的代碼:
#缺省屬性的初始化
//我們的錯誤日志設備,應當盡量保持簡單,避免代碼膨脹過大
System.Text.StringBuilder errorLog = new System.Text.StringBuilder();
private System.Boolean error=false;
public System.Boolean Error{get{return error;}}
public string ErrorLog{get{return errorLog.ToString();}}
//設置缺省的屬性
private string loginPath="WinNT://"+Environment.MachineName+",computer";
private string domainName=null;
private string loginUsername=null;
private string loginPassword=null;
private System.DirectoryServices.AuthenticationTypes authenticationType =
System.DirectoryServices.AuthenticationTypes.None;
private System.DirectoryServices.DirectoryEntry AD=null;
private System.Boolean connected=false;
#endregion
圖1.3 缺省屬性的初始化
注意我們是如何將LoginPath硬拷貝為WinNT提供商的。為了使DAL能夠與任何其他AD服務提供商配合,這一點必須進行改變。另外需要注意的是,我使用了System.Text.StringBuilder對象來保存錯誤日志,從而簡化了錯誤處理過程。在有錯誤發生的情況下,系統會簡單地添加一條日志,Boolean型變量error將會被設置為“真”值。下面的代碼是我們設計的類的構造器:(圖1.4)
#region .ctor's
public UserAdmin() {
Connect();
}
/// <摘要>
/// 在需要的時候,使我們能夠創建UserAdmin類
/// </摘要>
/// <param name="LoginUsername"></param>
/// <param name="LoginPassword"></param>
/// <param name="AuthenticationType"></param>
/// <param name="DomainName"></param>
public UserAdmin(string LoginUsername, string LoginPassword,
System.DirectoryServices.AuthenticationTypes AuthenticationType,
string DomainName) {
loginUsername=LoginUsername;
loginPassword=LoginPassword;
authenticationType=AuthenticationType;
if(DomainName=="" || DomainName==null)
DomainName=System.Environment.UserDomainName;
domainName=DomainName;
Connect();
}
/// <摘要>
/// 獲得UserAdmin類的另一種方式,可以指定另外一個LoginPath,例如LDAP或IIS。
/// </摘要>
/// <param name="LoginPath"></param>
/// <param name="LoginUsername"></param>
/// <param name="LoginPassword"></param>
/// <param name="AuthenticationType"></param>
/// <param name="DomainName"></param>
public UserAdmin(string LoginPath, string LoginUsername, string LoginPassword,
System.DirectoryServices.AuthenticationTypes AuthenticationType,
string DomainName) {
loginPath=LoginPath;
loginUsername=LoginUsername;
loginPassword=LoginPassword;
authenticationType=AuthenticationType;
if(DomainName=="" || DomainName==null)
DomainName=System.Environment.UserDomainName;
domainName=DomainName;
Connect();
}
#endregion